Manual Leather Die Cutter Press: Cut & Emboss Control
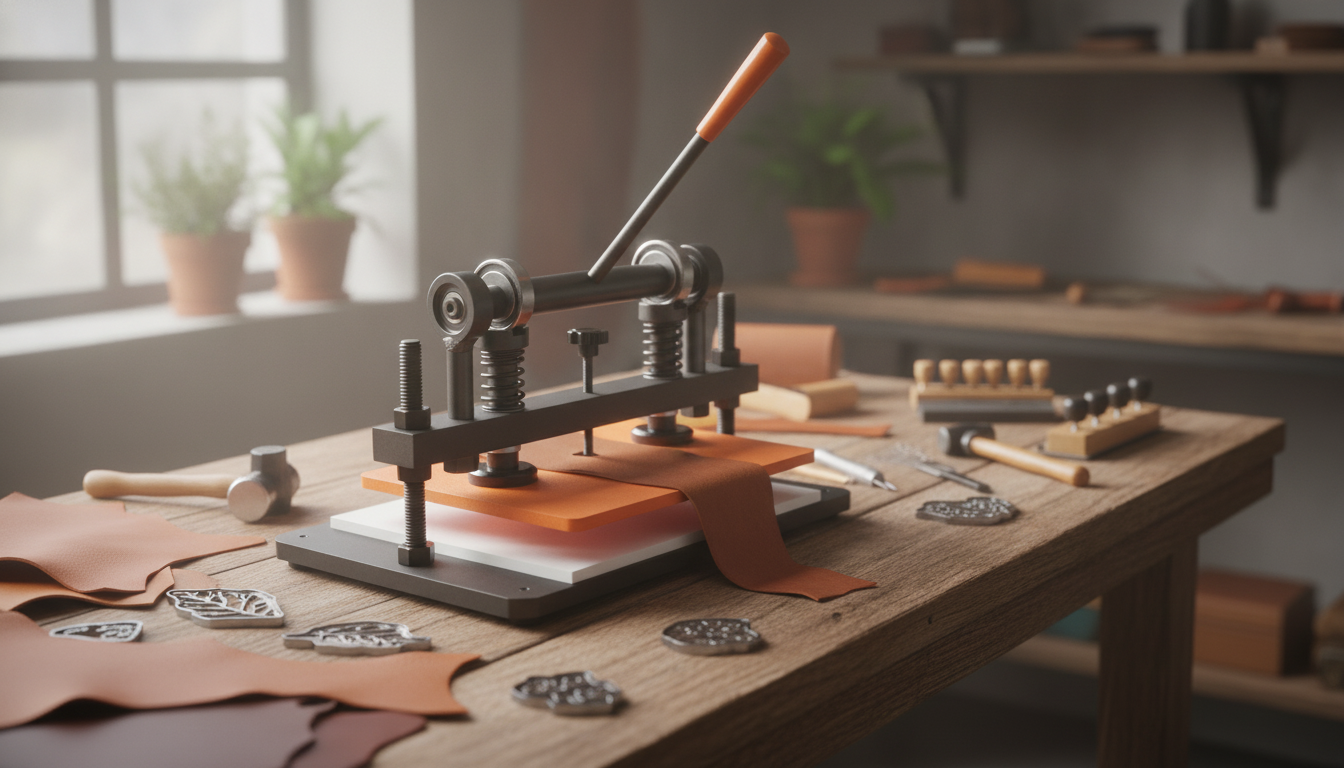
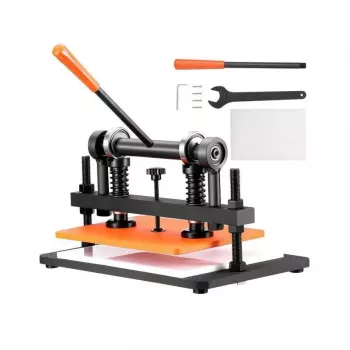
Leather Cutting & Embossing Machine: Manual Die Cutter with Adjustable Pressure Stroke
A manual die cutter that can both cut and emboss helps turn leatherwork from hand-slow to repeatable and consistent. Adjustable pressure and stroke control are especially useful when switching between thin vegetable-tan, thicker stacks, and different die heights. For makers who want clean edges, crisp impressions, and fewer redo pieces, a lever-driven press can be a practical upgrade from mallets, punches, and one-off hand methods.
What This Manual Die Cutter Does
A manual leather cutting and embossing press applies downward force through a controlled lever action, turning your setup (dies, plates, pads, and material) into a repeatable “stack” you can run again and again.
- Cuts leather using steel-rule dies or cutting dies by applying downward pressure through a lever-driven press action
- Embosses patterns or logos with embossing plates/dies by controlling how deeply material is pressed
- Supports repeatable results for batches of straps, patches, wallet parts, key fobs, and small panels
- Offers adjustable pressure and stroke to fine-tune output across different leather types and die setups
If your work includes multiple identical pieces—strap ends, tabs, card slots, small panels—this style of press helps keep shape and alignment consistent without relying on perfect hammer strikes.
Adjustable Pressure & Stroke: Why It Matters
Two adjustments make a big difference in daily use: how much force you apply (pressure) and how far the press travels (stroke). Together, they help you move between cutting and embossing without the “guess and check” that wastes material.
- Pressure adjustment helps avoid under-cuts on dense leather and helps prevent over-pressing that can crush grain or leave unwanted plate marks
- Stroke adjustment helps match the machine’s travel to die height, reducing wasted motion and improving control near the end of the press
- Fine tuning helps when changing between cutting (requires full die penetration) and embossing (often shallower, more controlled depth)
- More consistent outcomes across repeated pulls, especially when producing sets of identical parts
Common setups and what to adjust
| Task | Material/Dies | Suggested adjustment focus | Goal |
|---|---|---|---|
| Cutting small parts | Thin to medium leather + cutting die | Increase pressure gradually; set stroke to reach full cut | Clean cut-through with minimal distortion |
| Cutting thicker leather | Thicker leather or stacked layers + cutting die | Higher pressure; verify stroke and bed alignment | Complete cut without double-pressing |
| Embossing patterns | Embossing plate/die | Lower pressure; shorter stroke where possible | Crisp impression without crushing |
| Mixed work (cut + light emboss) | Combination runs | Create repeatable settings or mark reference points | Fast changeover with predictable results |
Typical Materials and Project Fit
This kind of press is typically used for leather goods where parts are small to medium and need to match from one run to the next.
- Leather types: often used for vegetable-tan, chrome-tan, and coated leathers; test on scrap to dial in pressure and avoid surface marking
- Other materials: some users cut gasket paper, thin rubber, or craft sheet materials; confirm die suitability and keep cutting surfaces appropriate
- Best project sizes: small-to-medium components that fit comfortably on the working bed (patches, tabs, strap ends, wallet panels)
- Batch work: improves repeatability when producing multiples and reduces hand fatigue compared to mallet-and-punch methods
When switching between leathers—especially from soft chrome-tan to firm veg-tan—small changes in pressure and stroke can be the difference between a clean edge and a fuzzy, incomplete cut.
Workflow: Getting Clean Cuts and Sharp Embossing
A consistent routine makes the machine easier to use and helps your dies last longer. The goal is to build a stable stack, align it squarely, then adjust in small increments.
- Start with a stable surface: place the machine on a sturdy bench to reduce wobble and uneven pressure
- Use the right pad/plate stack: a proper cutting pad helps protect dies and improves cut quality
- Make adjustments in small steps: increase pressure gradually, checking results on scrap after each change
- Align the die: ensure the die sits flat; uneven contact can cause partial cuts or skewed impressions
- For embossing: control depth, consider slightly dampening vegetable-tan leather for clearer impressions (test first), and keep the press motion smooth
Safety, Care, and Long-Term Accuracy
Manual presses are straightforward, but they still create pinch points and high localized force. Use conservative habits every time you set a die or reposition material. For general guidance on safe practices, review OSHA’s information on machine guarding and the HSE overview of safe use of work equipment (PUWER).
When a Manual Press Is the Right Choice
Product Details and Availability
The featured option in stock is the Leather Cutting & Embossing Machine – Manual Die Cutter with Adjustable Pressure Stroke, priced at $376.01 (USD). It’s designed for cutting and embossing leather parts with adjustable press control, making it a practical choice for repeatable runs and small-batch production.
Also in stock
- Women’s Color Block V-Neck Slim Fit Yoga Crop Top
- Pet Deshedding Brush for Cats & Dogs – Removes Loose Hair & Tangles
FAQ
How do pressure and stroke adjustments affect cut quality?
Pressure controls the force applied to the die, while stroke controls how far the press travels. Too little pressure can leave incomplete cuts, and too much can deform leather or leave marks; matching stroke to die height helps you reach full cut consistently without over-travel.
Can the same machine be used for both cutting and embossing?
Yes—cutting usually requires full die penetration with the correct cutting pad, while embossing works best with controlled depth and typically lower pressure. Keep separate reference settings and run a quick scrap test whenever you switch tasks.
What can cause uneven cuts or partial impressions?
Common causes include a die that isn’t sitting flat, an uneven or worn pad stack, debris under the leather, insufficient pressure, or misalignment on the bed. Re-seat the die, clean the surfaces, verify pad condition, and increase pressure in small steps until results are even.








Leave a comment